Category Archives: Episodes

Mama Lombardo’s Chicken Soup

I have a number of “staple” recipes in my kitchen, and one of them is my chicken soup. My kids, grandkids and entire family love my chicken soup and I am excited to share the recipe with you. It is great as pre-main meal appetizer or as a meal unto itself. We make it year round– including in the summer! There’s never an end to chicken soup season! I serve my chicken soup at Thanksgiving time and other holidays as an appetizer. Served hot and prinkled with some fresh parmagiano cheese, there’s nothing better!

Mama Lombardo’s Chicken Soup: served with mini-meatballs and carrots with pasta

My recipe is very straightforward. Unlike most other chicken soup recipes, I include mini-meatballs as part of the recipe. I make the base soup, and then mix the broth with the meatballs and pasta. I also serve the chicken and vegetables on the side, which can then be added to the soup mix.

Watch Episode 17 for full details of how to make Mama Lombardo’s Chicken Soup:

To make Mama Lombardo’s Chicken Soup, you will need:

* 1 whole, fresh chicken
* 2 tablespoons of salt
*1 teaspoon of pepper
* 2 tablespoons of fresh tomato sauce
* 1 large onion
* 5-6 carrots
* 1 bunch of celery
* 1/2 pound of ground turkey or beef, prepared for meatballs (see Episode 1 for meatball recipe)
* about 6-7 cups of water (will depend upon the size of the chicken and your pot)

Clean and butcher the chicken

First, you will need to clean and butcher the chicken. Place the chicken in a big pan of water. Sprinkle the chicken with some salt and let soak for 10 minutes. Next, you need to cut the chicken up, cutting the wings, legs and back into pieces. Wash the chicken, then add it back to the pan, covering it with water. Put it on the stove and let the water heat until you see all the excess waste material floating at the top. Turn off the heat, and then pour out all the water, straining the chicken. Rinse the chicken and then place back into a large pan and put on the stove.

Prepare the vegetables

Peel skin off the onion, leaving it whole. Put it aside in a bowl with some water. Next, take the skin off the carrots and cut off the ends. Place aside with the onion. Next, cut the very end of the leaves off the celery. Then cut the celery in half, taking the half with the leaves and placing it in the bowl with the onions and carrots. Place 3 of the cut celery stalks in the bowl as well. Finally, cut 3 of the carrots up with a knife, width-wise. Cut 3 of the carrots in half. Place the carrot halves in the bowl with the onion and celery. Take the carrot “wheels” and place them in a separate bowl (you’ll be cooking these with the meatballs).

Prepare the meatballs
You can use either ground turkey or beef for the meatballs. Once you’ve prepared the meat for meatballs (see Episode 1 for how to prepare the meatballs), start rolling them with your hands into small meatballs (about the size of a marble). Place them in a dish as you roll them out. Boil some water, and add the meatballs to the water. Also add the carrot wheels. Let the mixture boil for about 10 minutes.

Make the soup
Now that you’re done preparing all the ingredients, it’s time to make the soup! Turn the heat on high on the pan with the water and chicken it it (make sure you have enough water that the chicken is covered). Add the whole carrots, onions and celery to the water with the chicken. Add a tablespoon of salt and pepper. Finally, add the tablespoons of tomato sauce. The sauce will give the soup a rich color. Bring the soup to a boil. After 2-3 minutes of boiling, lower it to a simmer. You will need to let the soup simmer for about 60-90 minutes. You’ll know it’s done when the chicken and vegetables are fully cooked.

Mama Lombardo’s Chicken Soup

Cooking the pasta
The final step is cooking pasta, which you’ll serve with the soup. I prefer to use small sized pasta, preferably ancini di pepe. Cook the pasta al dente, then strain.

Serving the soup
When the soup is done, add some soup to meatballs and carrots. Then add soup the pasta. Finally, add meatballs and carrots to the pasta. Serve the chicken and vegetables on the side. Encourage your guests to mix the chicken and vegetables in with the soup! Finally, sprinkle the soup and pasta with some freshly grated parmigiano or pecorino romano cheese. Add pepper if desired. Serve hot and enjoy!

The soup is authentic, simple and tasty. It’s great fresh or saved for later. In fact, I often freeze my soupe and pull it out to serve at a later date.

We hope you enjoy Mama Lombardo’s Chicken Soup and will give it a try. Let us know your thoughts!

La Festa dei Sette Pesci: A Christmas Tradition

Christmas is a time of year that is full of tradition.  In my family growing up, Christmas wasn’t just one day, but an entire season full of spending time with family and eating different foods.  The festivities culminated with Christmas Eve and Christmas Day.  Fish was (and remains) the food that plays a central role for the Christmas holiday.  For many Italian families like mine, on Viglia di Natale (Christmas Eve), it’s about La Festa dei Sette Pesci (The Feast of the Seven Fish), where we serve seven types of fish (along with lots of other side dishes), typically served in one at a time in seven different courses.  La Festa dei Sette Pesci is common in Italy, particularly in southern Italy where my family came from.  The tradition draws its roots from our Christian faith around abstinence, or refraining from eating dairy or meat products on Friday or holidays, including Christmas time.  Instead, fish was eaten, typically fried in oil, baked or served with pasta.

Buona Natale! Mama Lombardo enjoying calamari ripieni and clams casino with her family

The reason seven fish are served tie back to Christian tradition as well, specifically to the frequency at which number seven is referred to in the Bible, with seven representing perfect completion.  Baby Jesus’ birth on Christmas represents this perfect completion, and seven fish are served for this reason. Seven, however, has evolved to many different numbers– 9, 11, 13, etc., so many families serve more.  It makes for a longer meal and more time with family and friends!

The fish can be any type of fish, including baccala, scungilli salad, calamari salad, baked cod, stuffed baked lobster, and many other types.  In my family, La Festa dei Sette Pesci usually consists of fried smelts, shrimp cooked scampi style with pasta and/or fried shrimp, baked scallops with breadcrumbs, fried grey of sole,  haddock prepared pizza aeola style (see Episode 5: Pizza Aeola), and the two recipes we share in this episode: clams casino and calamari ripieni (stuffed calamari) in tomato sauce served with spaghetti.

Clams Casino

I usually serve clams casino as an appetizer, but it can also be served a main course.  It’s an incredibly simple recipe, which only takes about 15 minutes to make.  The ingredients you need to make 6-7 clams on a half shell include: 1.5 pounds of fresh minced clams, 1 cup of seasoned breadcrumbs (see Episode 1- Classic Tomato Sauce and Meatballs for how to make the breadcrumbs), 1/4 cup of olive oil,  1/2 cup of tomato sauce, and oregano.

La Festa dei Sette Pesci: Clams Casino

Spread out your half shells on a baking sheet.  Evenly distribute the 1.5 pounds of minced clams across the shells, including some of the clam “juice” in the shell.  Add the olive oil to the breadcrumbs and mix thoroughly.  Once mixed, spread breadcrumbs on top of the clams, covering the entire surface of clams.  Next, spoon some tomato sauce on top of the breadcrumbs, then spread it out with a fork evenly over the surface.  Sprinkle oregano on each and then place in the oven  on a broil at 375 for about 10 minutes.  Once golden brown on top, you’re done!  Serve hot.

Calamari ripieni in tomato sauce

Calamari (or squid) is a common type of seafood used in Italian cuisine, particularly in Sicily where the culture and cuisine is so tied to the Mediterranean Sea.  There are many different ways to prepare it: fried, marinated in a salad, al forno, among others.  My favorite is in tomato sauce and served with pasta.  The calamari provide a rich, unique flavor to the sauce.  I also stuff some of the calamari, bake it in the oven (al forno) and then add it to the sauce as well.  You can serve it al forno style without adding it to the sauce, which is the way I typically make it, but my family likes it in the sauce as well, which is what I’m going to show you today.

La Festa dei Sette Pesci: Calamari tomato sauce

The ingredients you will need for calamari ripieni in the tomato sauce are: 1 pound of fresh calamari (the whole calamari), 1/4 cup of olive oil, 1 cup of seasoned breadcrumbs, 28 ounce can of tomato sauce, 1 clove of garlic, a 1/4 of a white onion, 1 celery stalk (the inside, tender stalks in the celery bunch), salt and pepper.

Start off by cleaning your calamari thoroughly.  Most fish markets sell the calamari already cleaned, but you want to make sure you check it over, washing it and removing any additional parts that may have been missed.  Once cleaned, get the long, tubular bodies of the squid and cut with a scissors into about 1/2 inch sections.  Cut up the tentacles as well. Place these sections aside for now. You will be adding these sections to the tomato sauce.

Use about 4-5 (or more if you prefer) of the tubular body sections to stuff.  Mix the olive oil with the breadcrumbs and mix thoroughly.  Stuff the breadcrumbs into the calamari, making sure you get it well-packed.  You need to seal the top of the calamari so the stuffing doesn’t fall out, so pin it shut using a toothpick.  Place the stuffed calamari into a casserole dish, and set aside.

Prepare the tomato sauce by heating a sauce pan on medium heat with some olive oil covering the bottom of the pan.  Once heated, add the clove of garlic (whole is fine, but you can also mince it), along with the white onion diced up.  Saute the onions until translucent.  Once done, add in the tomato sauce, a bit of water, and sprinkle in salt and pepper.  Let the sauce simmer for about 10 minutes.

Next, add the sliced up calamari rings and tentacles to the tomato sauce.  Slice up the tender celery stalk into small, diced pieces and add to the tomato sauce as well.  The calamari needs only 3-5 minutes to cook, and you don’t want to overcook it since it can become rubbery.  So watch it carefully!  Once cooked, set aside.

Next, take some of the tomato sauce and spread it over the stuffed calamari in the casserole dish.  Place it in the oven at 375 degrees for about 10-15 minutes.  You can tell it’s done when you can stick a fork through it easily.  Once done, remove from the oven and place in the tomato sauce.

Cook your spaghetti (or if you prefer linguine or fettuccini, you can use that instead) al dente.  Add the calamari sauce to the pasta and spread it evenly throughout.  Serve topped with grated pecorino romano or parmiggiano cheese. The calamari tomato sauce is best served right away for the best flavor.

Clams casino and calamari ripieni in tomato sauce served with spaghetti

Buona Natale!

Clams casino and calamari ripieni in tomato sauce served with spaghetti are just two of the types of fish you can make for Christmas Eve.  I hope that you will give them a try and make it part of your Christmas tradition.

From my family to yours, I wish you a heartfelt Buona Natale or Merry Christmas!

Having Fun Making Pizza Artisana (aka Pizza al Tracey)

We were fortunate to be joined by some special guests (and special friends) in the latest episode of Cooking with Mama Lombardo.  Tracey Zellmann and Susan (aka Susanna) Zollmann-Rohrer brought their special magic to the set of the show, and introduced us to Pizza Artisana (otherwise known as Pizza al Tracey).

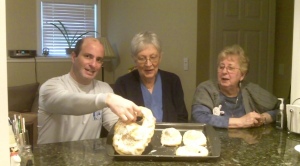
Tracey, Susan, Mama Lombardo and Gary

Pizza Artisana is something Tracey and Susan have been making for many years, every Friday night.  Tracey has a special process he goes through in preparing the pizza, including picking up the cheese at his favorite cheese shop (The Cheese Shop in Concord, MA) where he’s known as a regular, preparing the pizza stone with heated precision, “punching” the dough with great fan fare (I was lucky enough to do the punching this time!), and shaking the pizza for the final touch.   Tracey’s recipe is fantastic, and he shares all his secrets during a fun-filled Episode 11.

The recipe for Pizza Artisana is very simple and straightforward, and creates enough for two pizzas. Start off by pre-heating your oven to 500 degrees, including heating the pizza stone in the process.  The pizza stone will help cook the pizza and create a tasty, crunchy crust.

Preparing the dough

For the dough, you will need the following ingredients: 3 cups of flour, 1 teaspoon of salt, 1 tablespoon of sugar, 1 cup of hot water, 1 tablespoon of yeast, and a 1/4 cup of olive oil.

Start off by heating the hot water to about 110-115 degrees.  Mix the sugar and yeast thoroughly in the water.  Next, put the 3 cups of flour into a large bowl.  Add the olive oil, salt, and then mix in the water and yeast mix.  Mix thoroughly, preferably using an electric mixer, to make sure the ingredietns are well mixed and help knead the dough.  Once finished, place the dough in a large bowl that has been coated with olive oil and cover the bowl with plastic wrap.  Place the bowl in a warm spot and let the dough rise for about 2 hours.

Making the pizza

You will need the following ingredients for preparing the pizza:  2 balls of fresh mozzarella cheese, 1 large diced onion, and tomato sauce.

Slice up one of the balls of mozzarella cheese into small cubes.  Dice up the onion, and place on a dish in a microwave, heating it for 6 minutes.  Heating the onion helps soften up the onion for the pizza.

Once the dough has finished rising, you are ready to make the pizza.  Break the dough into two even balls.  Place one ball aside, and roll out the other into a flat, round circle.  Be sure to leave a small rise in the crust around the circumference of the pizza, which will be the crust and hold in the toppings.

Place the diced mozzarella on the pizza dough.  Next, spread the tomato sauce on the pizza evenly across the top.  Finally, add the onions on the pizza.

Spread some corn meal on a pizza board, which you will use to put the pizza in the oven.  The corn meal will help to make the pizza won’t stick to the pizza board. Place the pizza in the oven and cook for 11 minutes.  You want to make sure the pizza is well cooked, with the crust a golden brown color.  If it doesn’t show that color before it’s done, let it cook for a few more minutes.

Once done, you place the pizza on a open-faced grate for even cooling.  Once cooled, take the corn meal off the bottom of the pizza by shaking the grate over an open area, such as your sink.  Shake it until all the corn meal is off the pizza. Next, lightly brush on a coating of olive oil on the crust of the pizza, which will give it a nice flavor and shine.  Cut the pizza into even slices, and serve!

Thanks to Tracey and Susan

I want to give a special thank you to Tracey and Susan for being guests on the show.  We had a lot of fun, and appreciate them coming on.  As you can see in the video, we enjoyed the pizza together on a beautiful summer day, out in the sun and with some wine.  Exactly the way pizza was mant to be eaten!

Want More?

If you liked Pizza Artisana, be sure to check out Episode 2: Mama Lombardo’s Pizza, for another take on this Italian classic.

Interested in Being a Guest on Cooking with Mama Lombardo?

If you’re interested in being a guest on Cooking with Mama Lombardo, just let us know by dropping us an email at mamalombardo at gmail dot com.  The only requirements are that you have an Italian recipe that you feel comfortable cooking (and preferably have a story to go along with it!) and can cook in Mama Lombardo’s kitchen.  We’d love to have you!

Sicilian Classic: Chicken Marsala

In this episode, we have a very special guest who joins us to share one of her favorite ways to cook the Sicilian classic, chicken marsala.  My daughter Christina Lombardo Seiler visited me from where she lives in San Diego and while she was here we filmed Episode 8  of the Cooking with Mama Lombardo Show.

It’s always special when you get to cook with your daughter, especially when it’s a recipe she has learned how to cook so well.  In fact, chicken marsala is not a recipe that I normally have cooked over the years, despite the city of Marsala being only about 45 minutes from where my parents came from.  Marsala wine is a wine that we often drank growing up, and is the most famous fortified wine coming from Italy.  Marsala comes in either in a dry or sweet variety, either of which you can use in this recipe.

Gary, Mama Lombardo and special guest Christina Lombardo Seiler

Chicken marsala is a perfect recipe for the Cooking with Mama Lombardo Show: simple, authentic, delicious and fun.  We hope that you’ll give it a try!

The ingredients you will need for chicken marsala include: 2-3 chicken breasts, 1/2 cup of flour, 4 tablespoons of butter, 1 cup of marsala wine, 3 cups of sliced mushrooms, salt, pepper, 1 cup of chicken broth, and chopped chives.

Preparing the Chicken

Tenderize your chicken breasts, by pounding them with a tenderizing tool.  Mix the flour, salt, pepper and some dried oregano (optional) in a dish.  Dredge the chicken breasts in the flour so that you have them covered all over in flour.

Heat a medium size skillet on medium heat.  Add 1-2 tablespoons of butter. When melted, add the chicken to the pan and cook until golden brown on each side.  Be careful not to burn the chicken.  Once golden brown, take the chicken off and put on a plate.

Making the Marsala Sauce

While the pan is still hot, add another tablespoon of butter.  Add the sliced mushrooms into the pan and spread them out evenly over the pan.  Next, add the marsala wine into the pan, along with the chicken broth.  Add another tablespoon of butter.  Bring to a low boil, and then add the chicken into the sauce.  Cover the chicken and let it simmer for about 8-10 minutes.   If you would like to thicken the sauce up, you can take some of the excess flour and add it to the simmering sauce.

Once finished, take the chicken out of the pan and serve on a plate.  Add some mushrooms and sauce on top.  Sprinkle a dash of salt and pepper, and then add some chopped chives for garnish.  That’s it!  Serve with some marsala wine and enjoy!

Another Easter Classic: Pizza Gaina

Easter is a busy time of year in my kitchen, and this year has proven to be no exception.  I’m helping to prepare the Easter meal with my daughter-in-law this year.  While she’s making the main meal, I’ve got artichoke and asparagus frittatas ready to go, steamed artichokes, lasagna, broccoli rabe, a ricotta pie (which I’ll share with you in the next episode) and of course the Italian Easter cookies we shared with you earlier today.  In addition, we’ve also got pizza gaina, which is what we’ll be sharing with you in this episode.

Pizza gaina is a delicious, indulgent dish, used to celebrate the end of Lent and the high holiday of Easter.  It’s typically made on Good Friday and eaten on Easter Saturday or Easter Sunday to break the Lenten fast.  It’s indulgent because it includes several meats, which in the old days is something people avoided eating during certain times at Lent.

Pizza gaina is made throughout Italy, especially in southern Italy, and takes on different forms and names depending upon where you’re from.   It’s also known as pizza rustica and Italian ham pie (although other meats besides ham are in there).  No matter what it’s name, you’re going to love this recipe.

This is my sister-in-law, Elaine Angelo’s recipe, because it’s something that she has perfected over the years.  I actually haven’t made the dish that often, which is why we had Elaine join the show to show us how it’s done.  As always, please share your comments and thoughts– we’d love to know how it came out if you gave it a try!

My sister-in-law, Elaine Angelo, showing off her finished product.

The ingredients you’ll need for the crust are: 4 cups of flour, 2 tablespoons of sugar, 1/2 teaspoon of black pepper, 1 stick of butter, 3 eggs and a half a cup of milk.  For the filling you will need 1 lb of ricotta cheese, 1 pound of fresh cheese, 1/2 cup of grated pecorino romano cheese, 8-10 large eggs, 1/2 pound of prosciutto (cut up), 1/2 pound of boiled or baked hame (cut up), and 1/2 pound of sliced or cut up pepperoni.  You can substitute or add other meats, such as capicola, sausage or other meats.  This is definitely a meat-lovers dish (sorry, no vegetarian option available!).

Preparing the Crust

The crust on pizza gaina is a savory one.  Start off by putting the stick of butter in a large bowl, mixing in the sugar.  Use a mixer to make sure it’s mixed well.  Add the pepper, and then slowly mix in the eggs.  Finally, gradually mix in the flour and milk, bringing the crust to a nice consistency.  Finish off by kneading the dough with your hands into a nice large ball.  Break the ball into 2 pieces: one for the bottom crust and one for the top crust.

Take the first ball and roll it out with a rolling pin on a cooking board.  Roll it out to about a quarter inch thick.  You will be using a 9 inch pie pan, so make sure you have enough to cover the bottom of the pan.  Transfer the crust over to the pan.  Next, pinch the crust up the side of the pan, making sure it covers all the edges of the pan.  Use extra crust from the ball if you need to fill in any gaps. Once completed, set aside.

Making the Filling

Get a large bowl and add the 1 pound of fresh cheese.  Fresh cheese is an Italian cheese, which you can normally find at the grocery store in the Easter time of year.  If you have trouble finding it, you can substitute farmer’s cheese (or basket cheese).

Mix up the fresh cheese, and then add the ricotta cheese.  Mix the two together with a mixer, and then add in the percorino romano cheese.  Next, gradually mix in the 8-10 eggs.  Once mixed thoroughly, add the prosciutto, ham, and pepperroni (or other meats).  Use a wooden spoon to mix the meats in.  Once mixed, pour the filling into the pie shell.  Smooth out the filling on top with the spoon.

Adding the Crust Top

Take the other ball of dough, and roll it out in the same way as the crust bottom.  Transfer the rolled out dough to the top of the pie, fully covering the filling.  Use your hands to mold the pie top to meet the pie bottom, ensuring it sealed (if it’s not sealed, you will have the cheeses ooze out of the sides, which is not something you want).  Use a fork to press the seams down.  Once completed, cut a couple of small “breathing” slices on top through the crust.

Place in the oven for 50 minutes at 375 degrees.

Once it’s done, let it cool down.  You will be serving it cold, so put it in the refrigerator until ready to serve.

Pizza gaina is straightforward and bit of work, but worth every bite.  I hope you enjoy it.  I just wanted to offer a big thank you to my sister-in-law Elaine for sharing her recipe and walking us through this episode.  We look forward to having her back in future episodes!

Happy Easter to everyone!

Buona Pasqua! Italian Easter Cookies

The Easter season is one filled with rich traditions, including many types of foods.  Food plays a particularly important role on Easter Sunday since that is a day of great celebration and when Lenten fasts are over, allowing for the partaking in all the foods which were given up over Lent.  It’s a celebration of life, with food playing a central role (my type of holiday!).

My family developed many great recipes for Easter time over the years, a couple of which I hope to share with you in time for this year’s holiday, starting with the first dessert we’ve made on the Cooking with Mama Lombardo Show: traditional Italian cookies.  Italian cookies come in all sorts of flavors and varieties, but the recipe I’m sharing with you today is for plain cookies.  This is a recipe that comes from my mother and one that I’ve been cooking for years.  I call them Easter cookies since I shape them into a Easter baskets, with a hard boiled Easter egg in the pocket.  My kids loved these cookies growing up (and still do), and I’m sure yours will as well.  These cookies will make for a special gift for all friends and family members.   They’re great to include in an Easter basket with other traditional Easter sweets or on their own.  My family likes to eat these as part of Easter morning breakfast, dunking them into coffee or with espresso.  However, you can enjoy them anytime!

You can also use this cookie dough recipe to use in any shaped cookie you’d like. For instance, I use this same cookie dough recipe to make small round cookies, s-shaped cookies, and other shapes.  I encourage you to use this recipe to try other shaped cookies anytime of year.

We have a special guest this episode: my sister-in-law, Elaine Angelo.  Elaine is a great Italian cook in her own right, having learned the same style of cooking as me over the years of being married into the family.  In fact, Elaine pioneered some of her own recipes which I we’ll be sharing with you in the future (stay tuned for the next episode where Elaine shares one of these recipes: pizza gaina). Elaine makes the Italian Easter cookies, making a similar basket shape, which she shares with us in this episode.

This cookie recipe is authentic, tasty and fun, just like all the recipes on our show. It will take you about 1 hour to do everything, including making the dough, shaping the cookies, baking, letting the cookies cool and frosting the cookies.  The ingredients you’ll need are: 1 cup of sugar, 1 cup of vegetable oil, 6 large eggs (not hard boiled and for using for preparing the dough), 6 hard boiled white eggs (for cooking in the basket, not for mixing in the dough), 2 tablespoons of baking power, 1 tablespoon of vanilla, and 6 cups of flour.  For frosting the cookies (optional, but recommended), you’ll need: 1 cup of confectionary sugar, and a 1/4-1/2 cup of milk, 1 teaspoon of lemon extract and sprinkle toppings.  This recipe makes about 6 Easter basket cookies, depending upon how big you make the cookies.  We share two variations of Easter basket cookies: the larger one that Elaine makes and demonstrates in the video and the smaller one that I make and demonstrate.  The same cookie dough is used for both cookies.

Making the Cookie Dough

Start off by mixing the sugar and vegetable oil in a large bowl using a mixer.  Once you achieve a nice consistency, add the baking powder and mix.  Next, gradually add in the eggs, making sure they mix in consistently.  Add the vanilla.  Then finally, slowly add in the flour.  Add the flour in a little at a time, allowing for the dough to thicken.  You don’t want the dough to thicken too quickly which is why you should add it in slowly, making sure you achieve a good consistency (this may take less than the 6 cups of flour).  Finish the mixing process by hand.  You should have a big, consistent ball of dough at the end.

Making the Cookies

We’ve got two variations of Easter baskets you can make: large or small.  These directions are for the smaller baskets that I make (for the larger ones Elaine makes, roughly double the amount of dough.  See the video for more details). Break the dough into 4-5 smaller balls of dough.  Each ball should make one Easter basket cookie.  Take one ball, break it in half and roll it out with a rolling pin.  Try to get it about a 1/4 inch thick or so– not too thick or too thin.  This will serve as the base of the Easter basket cookie. Next, get a hard-boiled white egg and place it on the dough, about a little less than halfway down.

Take a small handful of dough, roll it out length wise into about a 1/2 inch thick string that is about 4-5 inches long.  Take the string of dough and place it along the top of the base of the basket in an upside “U” shape.  This will be the handle to the basket.

Finally, take the rest of the dough, roll it out flat (same thickness as before), and place it halfway over the hard boiled egg.  This is the base of the basket.  You can use small pieces of dough to make decorations on the basket, but I usually keep it plain.  Once completed, carefully transfer the whole cookie basket onto a flat cookie sheet.

Bake the cookies in the oven at 350 degrees for about 20 minutes.  You may require less or more cooking time depending upon the thickness of the cookies and your oven.  You’ll know the cookies are done when they have a slight golden color on top.

Frosting the Cookies

Once the cookies are cooled off, you can frost them.  Place your confectionary sugar into a small bowl and add the milk and lemon extract.  You’re looking to achieve a thick consistency (but not too thick), which you can brush onto the cookies.  Get a brush, dip it into the frosting, and brush on a thin coat onto the cookies.  Once fully coated, sprinkle the cookies with the sprinkles.

Buona Pasqua!

I hope you enjoy these cookies.  I want to wish you and your family a Happy Easter holiday season.  Buona Pasqua!

First Guest Appearance Makes Pizza Aeola Extra Special

We have a special treat for you in this episode of Cooking with Mama Lombardo: our first guests ever on the show!  Our hope is to more guests come on the show to share their Italian recipes (let us know if you’d like to come on- we’d love to have you!), and we start off with two very special guests for me, two of my grandchildren.  Marco and Malena both provide some great laughs and bring their own special techniques to preparing this episode’s dish, pizza aeola or Italian style fish.

Fish is an important part of the Italian diet, given the country’s connection with the Mediterranean Sea.  This is especially true in Sicily, where pesce spada (swordfish), tonno (tuna) and other big fish have played such an important role in everyday lives throughout history.  Even today, buying fresh fish in the open markets, such as Palermo’s Vucciria, is lively everyday adventure and part of life.

Fish also plays an important part of the diet at this time of year, which is Lent.  In Catholic Christian families around the world (Italian and otherwise), abstinence from meat (beef, pork, poultry) on Fridays is the practice.  From this practice, a tradition of serving  fish on Fridays evolved, a tradition we continue to embrace during the Lenten season (Ash Wednesday through Easter).

With this backdrop, I’m happy to share with you a special recipe handed down to me from my mother and aunts, called pizza aeola.  I’m not really certain of the derivation of the name since it’s been lost in time (and probably evolved– as has many of the recipe names from word of mouth over time– from pesca d’aglio or garlic fish), but the name is appropriate because the fish is prepared with classic pizza toppings, and brings back the same memories as does pizza (see Episode 2- Mama Lombardo’s Pizza).

This recipe is really easy to prepare, requiring about 30 minutes total.  The recipe serves about 3-4 people.  The ingredients you’ll need are: 1.5 lbs of cleaned, skinless haddock filets (use more if you’d like to increase serving size), 1 clovee of garlic (use 2 if you really like garlic!), a handful of celery (use the tender top stalk leaves– not the main stalks), whole tomatoes (crushed), a 1/4 of small white onion, pecorino romano cheese, a pinch of dried oregano, 1/4 cup of olive oil, and a pinch of salt and pepper.

Preparing the toppings

Dice the cloves of garlic into fine pieces and chop the onions and garlic into diced pieces.  Place them into seperate bowls.  Grate the pecorino romano cheese and place in a bowl.  For the tomatoes, you can use whole canned tomatoes or fresh tomatoes.  I only use fresh tomatoes if they are ripened and pulled fresh from the vine from the garden (typically only in the summertime).  Take the about 3-4 of the whole tomatoes and crush them up with a fork in a dish.  Set aside.

Preparing the fish

You will want to use a white, flaky fish for this recipe.  Haddock is the best fish to use.  Use fresh, not frozen fish.  When buying it from your fish market, ask to make sure it’s fresh (that day) and to have it fileted.   Make sure to have the skin removed (or you can remove the skin yourself at home if you so desire).

Wash the fish thoroughly, then place it in a large casserole dish.  We will be baking and broiling it on the oven, so make sure the dish you use is appropriate for doing so. After placing it the dish, add the toppings:  sprinkle the onions, garlic, celery, and tomatoes.  Spread them evenly on top of the fish.  Then sprinkle the oregano, salt and pepper over fish.  Finally, spread the olive oil over the fish.

I also like to add thinly sliced potatoes around the fish, which add a nice side dish to the meal, especially since they absorb the flavors of the fish as they cook.

After you place the toppings on the fish, you’re ready to place it in the oven to cook!  Pre-heat the oven to 350 degrees.  Once heated, place the fish in the middle of the oven for about 20 minutes.  After the 20 minutes is up, place your oven on broil, then move the fish to the top shelf of the oven for 3-5 minutes.  This will help the fish brown on top, which adds a delicious texture to the fish.

Take the fish out of the oven, then serve hot!  Buon appetito!

St. Joseph’s Day Pasta

Welcome to Episode 4 of Cooking with Mama Lombardo!

In Italy and in Italian families around the world, St. Joseph is an important saint.  His feast day is the 19th of March and is full of tradition that celebrates work and the family. Since bread is symbolic for the reward for the hard work that feeds one’s family, it is used as an important part of the celebration of St. Joseph’s day.  From breadwork art sculptures (as seen in the video and the photo below) to the ingredients in this episodes dish, bread is everywhere on St. Joseph’s day.

Bread sculpture artwork used in celebrating St. Joseph's Day

In fact, in the “old country”, the bread sculptures were (and still are) used to decorate shrines to St. Joseph.  The village where my parents are from in Sicily, Salemi, is one of the main creators of these bread sculptures and draws visitors from distant lands to enjoy the artwork.  Eating of course is an important part of the tradition, and St. Joseph’s day is often accompanied by many courses based in bread, vegetables and fruit picked this time of year.  Traditionally, zeppoli or zeppole– fried balls of dough hollowed out and filled with sweetened ricotta or custard cream– are served for dessert (perhaps we’ll make these in a future episode!).

Traditional Sicilian dessert, zeppola, served on St. Joseph's Day

It’s a great tradition, and I’m happy to share with you one of the recipes that came from my mother in celebration of St. Joseph’s day: pasta alla modiga (Sicilian) or pasta with the breadcrumbs, otherwise known as St. Joseph’s Day pasta.  It is one of those dishes that I only made once per year (March 19th) and brings back special memories for me, my children and my grandchildren.  It always reminds us of St. Joseph’s day and the celebration of family and our hard work.

St. Joseph was a carpenter and the breadcrumbs used in this pasta symbolizes the sawdust from the carpentry work.  It’s a simple dish to prepare, requiring few ingredients and taking only about 15 minutes to pull together.  In Episode 4, we walk through how to prepare the dish.  We hope you enjoy it and will make it part of your own traditions on March 19th to celebrate St. Joseph, family and a special reward for all your hard work!

The recipe shared here serves about 5-7 people.  You will need 1 pound of spaghetti, 1 large bag of unseasoned, plain breadcrumbs, 4-5 cloves of fresh garlic, several sprigs of fresh parsley (about 10-12), 3-4 tablespoons of freshly ground pecorino romano cheese, salt, pepper, 3-4 tablespoons of sugar and 1 cup of olive oil.

Preparing the Perfect Pasta

Cooking pasta the right way is critical for not only this dish, but any dish, so let’s review how you cook the perfect pasta.  Add 1-2 teaspoons of salt to the water and bring it to a boil.  Once it’s boiling, add the one pound of spaghetti.  Make sure the pasta is fully submerged in the boiling water.   Cook the pasta for about 10 minutes, aiming to get it al dente. Get a large colander to drain the pasta.  “Shock” the pasta by adding some cold water from the sink to the boiling water and pasta.  Drain the pasta in the colander.  Do not wash the pasta with water.  Once completed, add the pasta to the breadcrumb mix (or if you’re cooking pasta for another dish, add whatever topping to the pasta).

Preparing the Breadcrumbs

Prepare the breadcrumbs in a large pan which will be large enough to hold all the breadcrumbs plus the all the pasta.  Add the bag of breadcrumbs into the pan.  Mince the garlic cloves and add to the breadcrumbs.  Chop up the parsley and add that to the breadcrumbs, mixing it in.  Finally mix in the sugar, salt and pepper, and then a half cup of olive oil.  Make sure all the ingredients are mixed well with the breadcrumbs.   If you decide to store the breadcrumbs for later, you can do so by storing in a plastic bag in the freezer, where you can pull them out to use later (they typically will last several weeks in the freezer).

The final step is to take the drained, cooked spaghetti and add it to the pan.  Coat all of the pasta with breadcrumbs.  Once the pasta is fully coated, sprinkle the top of the pasta with the remainder of the olive oil.  The oil will help make the breadcrumbs stick to the pasta as well as add flavor.

Serve the pasta hot in large bowl.  Sprinkle some of the excess breadcrumbs on top, and you’re ready to eat!  Buon appetito!

Eggplant Parmigiana

One of the most popular items among family members that I cook is eggplant parmesan.  I bring it to family birthday parties, holiday parties and other family gatherings, where I always leave with an empty pan.

Eggplant parmesan or parmigiana di melanaza is a classic southern Italian dish, particularly in Sicily.  Eggplants like warm and dry climates, so southern Italy is an ideal native ground for this plant.  Eggplants are used in a variety of dishes– in pasta, on pizza, in spreads, in salads, among other things.  It’s truly a versatile vegetable.

In Episode 3 of our show, we walk through how your prepare the fresh eggplant, battering and frying the eggplant, assembling the dish and finally, baking to perfection.  We hope you enjoy the show and will give the recipe a try.  Please share any comments.

The recipe shared in this episode makes enough for 5-7 people (or more depending upon how many servings and how hungry your guests are).   You will 2 fresh eggplants (1 large, 1 small/medium sized), 28 ozs of tomato sauce (be sure to prepare it as shown in Episode 1 (without the meat in the sauce), 2-3 cups of seasoned breadcrumbs, 2 eggs, salt, pepper, 1 cup of freshly grated parmesan or pecorino romano cheese, 3 cups of fresh shredded mozzarella, approximately 3-4 cups of water in a bowl, and lots of olive oil (as much as needed for frying).  You will also need a 8 x 11 inch (2 quart) pan for cooking.  If you’d like to make a larger dish (which I usually do), simply prepare more eggplants, up the amount of ingredients and use a bigger pan!

Preparing the Fresh Eggplant

Peel the 2 fresh eggplant, removing all the skin.  Once all the skin is removed, getting a sharp knife and cut the eggplant into 1/2 inch slices.  Place the eggplant slices into a large bowl of salt water (you’ll need about 3 -4 cups of water with about 3 teaspoons of salt dissolved in).  Let all of the eggplant slices soak in the salt water for about 5 minutes.  The goal is to soften the eggplant up so you can more easily remove the seeds, as well as to make the eggplant softer for frying.   Once done soaking, take a knife and scrape the seeds off of each of the eggplant slices.  The seeds are bitter and you should seek to remove as many as possible before cooking.    As you finish removing the seeds, place each eggplant slices on paper towels, drying them all around.

Batter and Fry the Eggplant Slices

Before battering and frying, prepare your tomato sauce.  You should prepare it the same way as we reviewed in Episode 1.  Keep it on a very lower simmer on the stove while you batter and fry the eggplant slices.

Take your 3 cups of seasoned breadcrumbs and place them in a large flat dish.  Crack and beat the 2 eggs into a dish, adding salt and pepper.  Take an eggplant slice with a fork and coat it in the egg.  Once fully coated with the egg, place it in the breadcrumbs, ensuring it is fully coated in breadcrumbs.  Repeat until all the eggplant slices are fully coated in breadcrumbs.

Get a large frying pan, and place it on the stove at medium heat.  Add olive oil.  You want to be sure to have enough oil to get a good frying process going– too little oil can burn the eggplant, so be careful.   Keep adding enough oil so the frying process continues without burning the eggplant.

Once the oil is nice and hot, add your eggplant slices, covering the pan.  Cook each slice until golden brown on each side, then place onto a dish with paper towels (you can layer the eggplant slices on top of one another with paper towels in between each layer).  If the olive oil becomes “dirty” or in other words, there are a lot of residual breadcrumbs pieces mixed in, swap out the dirty oil for fresh olive oil.

Layer the Eggplant in the Pan

Now you’re ready for the fun part (or the next fun part!).  There is no science behind how many layers of eggplant you should have for the perfect eggplant parmesan– just layer it until you reach the top of the pan.

Take your pan and coat the bottom with some of your tomato sauce.  Take an eggplant slice, coat it in tomato sauce, then place it in the pan.  Repeat with each slice until you’ve fully completed the layer.  Before going onto the next layer, sprinkle the grated parmesan cheese (or pecorino romano) over the layer, as well as sprinkle the fresh grated mozzarella cheese over the layer.  Build the next layer, repeating the process of adding the grated parmesan and shredded mozzarella in between each layer.  When you reach the top layer, top it off with the parmesan cheese and mozzarella.  Add some tomato sauce along the sides of the dish (don’t place any on top!).  That’s it!  Now you’re ready to bake it.

Baking the Eggplant Parmesan

Pre-heat your oven to 350 degrees.  Place your pan of eggplant parmigiana into the middle of the oven.  Let it bake for about 20 minutes, rotating about halfway through.  I like to get a nice golden brown, crispy layer on top, so I move it to the top shelf of the oven after the 20 minutes is up, for about another 5-7 minutes.  Keep a close eye on it, making sure it doesn’t burn.  Once crispy on top, you’re ready to serve!

Make sure you serve the eggplant parmigiana hot!  It’s easy to re-heat if it cools down, which you can do in the oven.  You can serve with some tomato sauce on the side, as well as grated parmesan cheese.  It goes great with red wine.  Buon appetito!

Mama Lombardo’s Pizza

Pizza is one of the classic dishes that everyone loves.  Pizza has been modified to all different forms around the world, but nothing compares to the pizza recipe I grew up with.  When my parents came over from Italy, they cooked a thick crust pizza as was the tradition in Sicily.  My aunts, sister-in-laws and I modified the approach over the years to a thinner crust, while keeping the recipe true to its origins.  In Sicily today, you can find thick crust, as well as thin crust.  In fact, thin crust is more common, and it’s especially delicious when baked in a wood oven stove.  You don’t need a wood oven stove for my recipe (a regular electric or gas stove will work fine), but you will still need enough love, heart and soul that goes into a great pizza!  I have great memories of making trays of pizzas for my kids, grandkids and all their friends, and I hope that you’ll be able to create some similar great memories with my recipe.

Episode 2 walks you through how to make the pizza dough, prepare the pan, place on the toppings and baking the pizza.  Watch it and let us know your thoughts!  We really enjoy your comments and would love to hear from you.

Making the Pizza Dough

The ingredients for making the dough for 3-4 pizzas (about 18 inches x 12 inches) are:

6 cups of flour (white flour), 2 cups of luke warm water, 2 one oz. packs of yeast, 1/4 cup of olive oil, 1 tablespoon of salt, 1 teaspoon of sugar

Place the 6 cups of flour in a large pan (make sure it’s big enough for you to knead and manipulate the dough).  Add the salt, sugar and olive oil with the flour and mix well.    Mix the yeast with the water.  Stir it in for about 1-2 minutes until mixed well.  The slowly pour a little bit of water in with the flour mix.  Stir it, then add some more water.  Stir again.  Keep adding the water slowly until well mixed.  If the dough is sticky, add some additional flour.  The goal is to get the dough’s consistency smooth and even, so that’s not sticking to your fingers.  Knead it with  your hands, punching it down until the dough is smooth.

Keeping the dough in a single big ball, place a cloth over the top of the dough.  Put a cover on top of the pan, and place in a warm spot to rise.  Let the dough rise for about 75-90 minutes.  The dough should rise about 3-4 inches, pushing the cloth upward.  When it’s finished rising, break the dough into even, individual pizza dough balls (this recipe will allow for about 4 dough balls).  Round the individual balls out, then cover each with a cloth in a warm spot and let them re-rise for about 15 minutes.

Preparing the Pizza Dough

The ingredients you’ll need to prepare the pizza dough on the pan are 2 tablespoons of olive oil and 1/2 tablespoon of grated pecorino romano cheese.

First, prepare your 18 x 12 x 1 pizza pan by coating it with olive oil.  The olive oil will help the dough spread and ensure it doesn’t stick to the pan.  You probably will need about 2 tablespoons of oil.  Use a paper towel or cloth to spread the oil.

Once the pan is prepared, take one of the individual pizza dough balls, place it on the pan and begin stretching it out with your hands.  Carefully pull it out, starting at the center of the ball, and then outward towards the edges of the pan.  The dough should be thin, without tearing.  If you do tear the dough, gently cover it up with some more dough.  Add some grated pecorino romano cheese on top of the dough to help with the stretching process (it will give you some friction), as well as some flavor to the dough.  You have a finished stretching the pizza dough out when it cover the entire surface of the pan, with only a small space between the edge of the dough and the edge of the pan all around.

Adding the Toppings

The ingredients you’ll need for toppings for 4 pizzas are one 28 oz can of pureed tomato (Pastene Kitchen Ready tomato sauce is recommended), about 4-5 cups of mozzarella cheese (grated from a package or fresh is fine), 2 tablespoons of olive oil, 3 diced cloves of garlic, a pinch of salt, a pinch of pepper, a pinch of dried oregano and whatever toppings you’d like.  I recommend keeping it simple and either keeping it plain or adding prosciutto, mushrooms and/or roasted red peppers.

Heat the tomato sauce in a small pan on the stove.  Heat it enough so it just gets warm– do not bring it to a boil.  Low to medium heat for about 5-7 minutes is plenty.

Add a handful of minced garlic on the pizza (if you really like garlic, add more). Spread 4-5 large spoonfuls (a wooden spoon is recommended) of tomato sauce over the top of the pizza.  Use the back of the spoon to spread the sauce over the dough, making sure it covers the entire pizza dough.  Spread the grated mozzarella cheese over the pizza, getting good coverage all over the pizza.  If you like extra cheese, feel free to add it, but I think a pizza with a moderate amount of cheese is best.  Now you can add whatever toppings you’d like (stay clear of too many toppings– the simpler the better).  In the video, I add mushrooms and roasted red pizza, but most of the time don’t add any and serve it plain.  Sprinkle the salt, pepper and oregano over the pizza.  Next, sprinkle about 2 tablespoons of olive oil over the pizza, and then you’re ready to get it into the oven.

Baking the Pizza

Once you’ve added the toppings, you’re ready to bake the pizza.  Pre-heat the oven to 500 degrees (if your oven can’t reach that temperature, 450 degrees works).  The higher temperature will get a nice crispy texture to the pizza.  Place your pizza into the oven, about halfway down.  You will cook the pizza for 10-15 minutes maximum.  About halfway through cooking, be sure to check the bottom of the pizza to make sure it’s not sticking or burning.  Lift it with a fork all the way around.  Turn the pizza around in the oven for even baking.  You will know the pizza is finished when it looks slightly brown on top and the sides.  After 10-15 minutes, pull it out of the oven, and let it cool for a few minutes.  Cut it (I like cutting it into squares, but any shape works!), and you’re ready to serve!

Serve the pizza by itself or whatever side dishes you’d like.  A pilsner beer goes well with pizza (or wine if you prefer).  Buon appetito!